I recently came up with a unique and free way to do screen recording and broadcasting by leveraging a few unrelated, open source software components. The intention is not for brief screen captures, but to permanently record. Meaning, begin the recording on logon/unlock and stop at logoff/lock with the ability to monitor the session live, hear audio from the local microphone, and optionally activate the webcam and overlay it in a corner of the view.
Here’s a high-level overview of how everything will work:
- NGINX is running with the RTMP module ready to receive RTMP AV streams and record them, making a new file every 5 minutes
- FFmpeg launches at logon/unlock sending an RTMP stream to NGINX either locally or on a server remotely. It will use the UScreenCapture DirectShow filter and optionally connect to a local microphone and/or webcam.
- During streaming, the session can be viewed live. FFplay, VLC, or flowplayer will works for this.
- FFmpeg is killed at logoff/lock and the recording is stopped on NGINX.
- Recordings can be viewed with ffplay or VLC.
Here’s what you’ll need to get it working:
- The most recent ffmpeg build for windows http://ffmpeg.zeranoe.com/builds/
- The Screen Capture DirectShow Source Filter from Unreal Streaming Technologies http://www.umediaserver.net/components/index.html
- NGINX compiled with the RTMP module https://kernelmanic.com/wp-content/uploads/2015/12/nginx1.zip
- VLC http://www.videolan.org/vlc/download-windows.html
I’m providing the NGINX build I found because it has the RTMP module compiled in, I’ve already put the stats.xsn file from the RTMP module in the html directory, and it already has the necessary configuration. It may not be the latest build out there, so feel free to use it as a reference for a better download you can probably find elsewhere.
To get everything in place, extract your ffmpeg download into C:\ffmpeg. This way the executable will be located at C:\ffmpeg\bin\ffmpeg.exe. Do a normal “next, next, finish” install of UScreenCapture. Finally, download the nginx zip and extract it to C:\nginx so that the executable is located at C:\nginx\nginx.exe. Feel free to install these components in alternative locations, but understand that you will need to modify the commands I provide accordingly.
Before we get ahead of ourselves, let’s make sure everything is working correctly. Start by opening a command prompt and typing “C:\ffmpeg\bin\ffmpeg.exe -list_devices true -f dshow -i dummy”. We need to make sure that the dshow filter “UScreenCapture” is listed in the output.
C:\ffmpeg\bin\ffmpeg.exe -list_devices true -f dshow -i dummy
ffmpeg version N-73266-g4aa0de6 Copyright (c) 2000-2015 the FFmpeg developers
  built with gcc 4.9.2 (GCC)
  configuration: --enable-gpl --enable-version3 --disable-w32threads --enable-avisynth --enable-bzlib --enable-fontconfig --enable-frei0r --enable-gnutls --enable-iconv --enable-libass --enable-libbluray --enable-libbs2b --enable-libcaca --enable-libdcadec --enable-libfreetype --enable-libgme --enable-libgsm --enable-libilbc --enable-libmodplug --enable-libmp3lame --enable-libopencore-amrnb --enable-libopencore-amrwb --enable-libopenjpeg --enable-libopus --enable-librtmp --enable-libschroedinger --enable-libsoxr --enable-libspeex --enable-libtheora --enable-libtwolame --enable-libvidstab --enable-libvo-aacenc --enable-libvo-amrwbenc --enable-libvorbis --enable-libvpx --enable-libwavpack --enable-libwebp --enable-libx264 --enable-libx265 --enable-libxavs --enable-libxvid --enable-lzma --enable-decklink --enable-zlib
  libavutil      54. 27.100 / 54. 27.100
  libavcodec     56. 45.101 / 56. 45.101
  libavformat    56. 40.100 / 56. 40.100
  libavdevice    56.  4.100 / 56.  4.100
  libavfilter     5. 19.100 /  5. 19.100
  libswscale      3.  1.101 /  3.  1.101
  libswresample   1.  2.100 /  1.  2.100
  libpostproc    53.  3.100 / 53.  3.100
[dshow @ 00000000032335c0] DirectShow video devices (some may be both video andaudio devices)
[dshow @ 00000000032335c0]  "USB Video Device"
[dshow @ 00000000032335c0]     Alternative name "@device_pnp_\\?\usb#vid_046d&pid_0825&mi_00#7&218d6046&0&0000#{65e8773d-8f56-11d0-a3b9-00a0c9223196}\global"
[dshow @ 00000000032335c0]  "UScreenCapture"
[dshow @ 00000000032335c0]     Alternative name "@device_sw_{860BB310-5D01-11D0-BD3B-00A0C911CE86}\UScreenCapture"
[dshow @ 00000000032335c0]  "screen-capture-recorder"
[dshow @ 00000000032335c0]     Alternative name "@device_sw_{860BB310-5D01-11D0-BD3B-00A0C911CE86}\{4EA69364-2C8A-4AE6-A561-56E4B5044439}"
[dshow @ 00000000032335c0] DirectShow audio devices
[dshow @ 00000000032335c0]  "Microphone (USB Audio Device)"
[dshow @ 00000000032335c0]     Alternative name "@device_cm_{33D9A762-90C8-11D0-BD43-00A0C911CE86}\Microphone (USB Audio Device)"
[dshow @ 00000000032335c0]  "virtual-audio-capturer"
[dshow @ 00000000032335c0]     Alternative name "@device_sw_{33D9A762-90C8-11D0-BD43-00A0C911CE86}\{8E146464-DB61-4309-AFA1-3578E927E935}"
[dshow @ 00000000032335c0]  "Microphone (Realtek High Defini"
[dshow @ 00000000032335c0]     Alternative name "@device_cm_{33D9A762-90C8-11D0-BD43-00A0C911CE86}\Microphone (Realtek High Defini"
dummy: Immediate exit requested
In the same command prompt, do the following:
cd C:\nginx

start "" nginx.exe
That should start nginx in the background and you should be able to browse to http://127.0.0.1:81/ and see “Welcome to nginx for Windows!” I used port 81 in the configuration in C:\nginx\conf\nginx.conf to avoid conflict with other web servers that might be installed. If for some reason nginx isn’t working for you, check error.log located in C:\nginx\logs. If this is done in any sort of production configuration, I highly recommend compiling the latest build with the RTMP module on a linux server.
Now, from a command prompt, enter the command “C:\ffmpeg\bin\ffmpeg -analyzeduration 2147483647 -probesize 2147483647 -rtbufsize 1500M -f dshow -i video=”UScreenCapture” -c:v libx264 -vf “scale=trunc(iw/2)*2:trunc(ih/2)*2″ -crf 40 -profile:v baseline -x264opts level=31 -pix_fmt yuv420p -preset ultrafast -f flv rtmp://127.0.0.1/view/%USERNAME%-%COMPUTERNAME%”. If you’d like you can use a streaming URL like rtmp://127.0.0.1/view/test. I like to try and use something that will be unique if multiple streams are being broadcasted, but something that is also meaningful.
C:\ffmpeg\bin\ffmpeg -analyzeduration 2147483647 -probesize 2147483647 -rtbufsize 1500M -f dshow -i video="UScreenCapture" -c:v libx264 -vf "scale=trunc(iw/2)*2:trunc(ih/2)*2" -crf 40 -profile:v baseline -x264opts level=31 -pix_fmt yuv420p -preset ultrafast -f flv rtmp://127.0.0.1/view/%USERNAME%-%COMPUTERNAME%
ffmpeg version N-73266-g4aa0de6 Copyright (c) 2000-2015 the FFmpeg developers
  built with gcc 4.9.2 (GCC)
  configuration: --enable-gpl --enable-version3 --disable-w32threads --enable-avisynth --enable-bzlib --enable-fontconfig --enable-frei0r --enable-gnutls --enable-iconv --enable-libass --enable-libbluray --enable-libbs2b --enable-libcaca --enable-libdcadec --enable-libfreetype --enable-libgme --enable-libgsm --enable-libilbc --enable-libmodplug --enable-libmp3lame --enable-libopencore-amrnb --enable-libopencore-amrwb --enable-libopenjpeg --enable-libopus --enable-librtmp --enable-libschroedinger --enable-libsoxr --enable-libspeex --enable-libtheora --enable-libtwolame --enable-libvidstab --enable-libvo-aacenc --enable-libvo-amrwbenc --enable-libvorbis --enable-libvpx --enable-libwavpack --enable-libwebp --enable-libx264 --enable-libx265 --enable-libxavs --enable-libxvid --enable-lzma --enable-decklink --enable-zlib
  libavutil      54. 27.100 / 54. 27.100
  libavcodec     56. 45.101 / 56. 45.101
  libavformat    56. 40.100 / 56. 40.100
  libavdevice    56.  4.100 / 56.  4.100
  libavfilter     5. 19.100 /  5. 19.100
  libswscale      3.  1.101 /  3.  1.101
  libswresample   1.  2.100 /  1.  2.100
  libpostproc    53.  3.100 / 53.  3.100
Input #0, dshow, from 'video=UScreenCapture':
  Duration: N/A, start: 860828.177000, bitrate: N/A
    Stream #0:0: Video: rawvideo, bgr24, 3200x1200, 10 tbr, 10000k tbn, 10 tbc
[libx264 @ 000000000322bee0] frame MB size (200x75) > level limit (3600)
[libx264 @ 000000000322bee0] MB rate (150000) > level limit (108000)
[libx264 @ 000000000322bee0] using cpu capabilities: MMX2 SSE2Fast SSSE3 SSE4.2AVX
[libx264 @ 000000000322bee0] profile Constrained Baseline, level 3.1
[libx264 @ 000000000322bee0] 264 - core 146 r2538 121396c - H.264/MPEG-4 AVC codec - Copyleft 2003-2015 - http://www.videolan.org/x264.html - options: cabac=0 ref=1 deblock=0:0:0 analyse=0:0 me=dia subme=0 psy=1 psy_rd=1.00:0.00 mixed_ref=0 me_range=16 chroma_me=1 trellis=0 8x8dct=0 cqm=0 deadzone=21,11 fast_pskip=1 chroma_qp_offset=0 threads=12 lookahead_threads=2 sliced_threads=0 nr=0 decimate=1 interlaced=0 bluray_compat=0 constrained_intra=0 bframes=0 weightp=0 keyint=250 keyint_min=10 scenecut=0 intra_refresh=0 rc=crf mbtree=0 crf=40.0 qcomp=0.60 qpmin=0 qpmax=69 qpstep=4 ip_ratio=1.40 aq=0
Output #0, flv, to 'rtmp://127.0.0.1/view/username-hostname':
  Metadata:
    encoder         : Lavf56.40.100
    Stream #0:0: Video: h264 (libx264) ([7][0][0][0] / 0x0007), yuv420p, 3200x1200, q=-1--1, 10 fps, 1k tbn, 10 tbc
    Metadata:
      encoder         : Lavc56.45.101 libx264
Stream mapping:
  Stream #0:0 -> #0:0 (rawvideo (native) -> h264 (libx264))
Press [q] to stop, [?] for help
frame=   14 fps= 14 q=27.0 size=     134kB time=00:00:00.10 bitrate=10985.6kbits
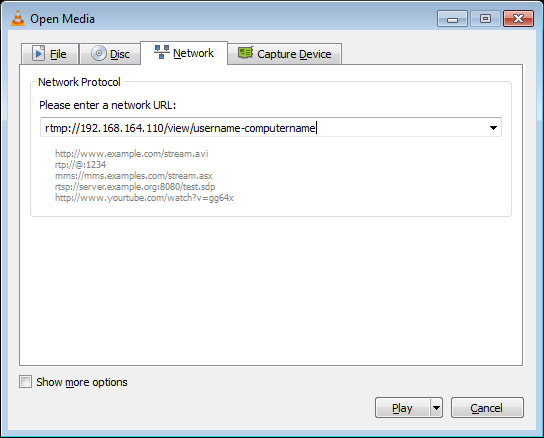
If the stream is working properly, you should see some statistics at http://127.0.0.1:81/stats, and you should see recordings being generated within C:\nginx\recordings. Use VLC to play the recordings. To view the stream live with VLC click Media->Open Network Stream and enter the network URL “rtmp://192.168.164.110/view/username-computername”. Keep in mind that the username and computername here are case sensetive and should match exactly what is shown on the statistics page http://127.0.0.1:81/stats.

Be patient as it can take some time for VLC to detect the video codec before it begins displaying. You can press “q” or Ctrl+c to stop the ffmpeg stream.
I did my best to tweak the command so that there is a good balance of quality and efficiency, but if you’d prefer higher quality video try changing the -crf parameter to a lower value like 23 or a slower -preset value like “fast”. A word of caution, the slower the preset you choose, the higher your CPU utilization will be. The “scale=trunc(iw/2)*2:trunc(ih/2)*2” part of the command is to avoid “not divisible by 2” errors when either your height or width stream resolution is an odd number. I ran into this in our VDI environment because you can resize the screen of the client to be any size you want and will frequently have this problem.
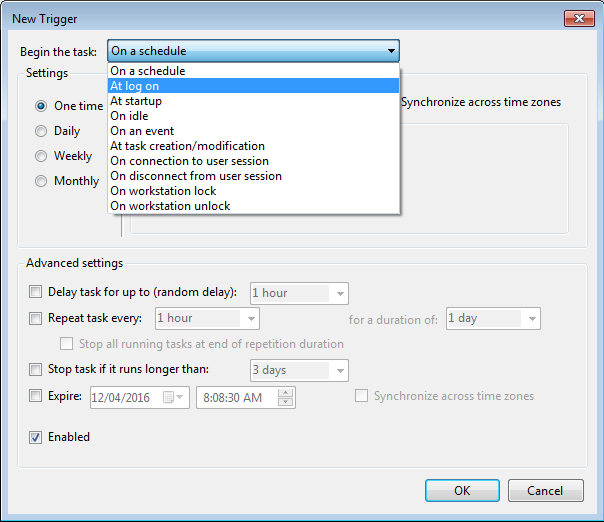
If video is all you need, at this point you can simply run the following vbs script using task scheduler with a logon and unlock event as the trigger:
Option Explicit

Dim WshShell

Set WshShell = CreateObject("Wscript.Shell")

WshShell.Run "C:\ffmpeg\bin\ffmpeg -analyzeduration 2147483647 -probesize 2147483647 -rtbufsize 1500M -f dshow -i video=""UScreenCapture"" -c:v libx264 -vf ""scale=trunc(iw/2)*2:trunc(ih/2)*2"" -crf 40 -profile:v baseline -x264opts level=31 -pix_fmt yuv420p -preset ultrafast -f flv rtmp://127.0.0.1/view/" & WshShell.ExpandEnvironmentStrings("%USERNAME%") & "-" & WshShell.ExpandEnvironmentStrings("%COMPUTERNAME%"), 0, False

To kill ffmpeg at logoff/lock, use task scheduler again with the appropriate triggers and run the command taskkill /f /im ffmpeg.exe.
When I first set out to get screen recording working for my purposes, I was originally attempting to save directly to an MP4 over a CIFS share, but I still had to kill the ffmpeg process because obviously we want in running in the background and there is no way to interact with the process to stop it gracefully. Terminating the process in this way would corrupt the MP4. With NGINX receiving the RTMP stream and handling all of the recordings independently of ffmpeg, you are able to kill the process without corrupting the video files.
Be sure to do some testing to make sure ffmpeg is terminating and launching correctly during the events you are using to trigger it. It is a good idea to set up an idle timeout/screensaver that locks your workstation and kills ffmpeg’s stream to avoid wasting storage on useless video.
I’ll try to post some more flexible/dynamic scripts later to demonstrate how to capture audio from the local microphone and overlay a webcam. If you have any input or questions, please comment below.