Windows screen recording with FFmpeg UScreenCapture and NGINX RTMP module

I recently came up with a unique and free way to do screen recording and broadcasting by leveraging a few unrelated, open source software components. The intention is not for brief screen captures, but to permanently record. Meaning, begin the recording on logon/unlock and stop at logoff/lock with the ability to monitor the session live, hear audio from the local microphone, and optionally activate the webcam and overlay it in a corner of the view.


Here’s a high-level overview of how everything will work:

  • NGINX is running with the RTMP module ready to receive RTMP AV streams and record them, making a new file every 5 minutes
  • FFmpeg launches at logon/unlock sending an RTMP stream to NGINX either locally or on a server remotely. It will use the UScreenCapture DirectShow filter and optionally connect to a local microphone and/or webcam.
  • During streaming, the session can be viewed live. FFplay, VLC, or flowplayer will works for this.
  • FFmpeg is killed at logoff/lock and the recording is stopped on NGINX.
  • Recordings can be viewed with ffplay or VLC.

Here’s what you’ll need to get it working:

I’m providing the NGINX build I found because it has the RTMP module compiled in, I’ve already put the stats.xsn file from the RTMP module in the html directory, and it already has the necessary configuration. It may not be the latest build out there, so feel free to use it as a reference for a better download you can probably find elsewhere.

To get everything in place, extract your ffmpeg download into C:\ffmpeg. This way the executable will be located at C:\ffmpeg\bin\ffmpeg.exe. Do a normal “next, next, finish” install of UScreenCapture. Finally, download the nginx zip and extract it to C:\nginx so that the executable is located at C:\nginx\nginx.exe. Feel free to install these components in alternative locations, but understand that you will need to modify the commands I provide accordingly.

Before we get ahead of ourselves, let’s make sure everything is working correctly. Start by opening a command prompt and typing “C:\ffmpeg\bin\ffmpeg.exe -list_devices true -f dshow -i dummy”. We need to make sure that the dshow filter “UScreenCapture” is listed in the output.

C:\ffmpeg\bin\ffmpeg.exe -list_devices true -f dshow -i dummy
ffmpeg version N-73266-g4aa0de6 Copyright (c) 2000-2015 the FFmpeg developers
  built with gcc 4.9.2 (GCC)
  configuration: --enable-gpl --enable-version3 --disable-w32threads --enable-avisynth --enable-bzlib --enable-fontconfig --enable-frei0r --enable-gnutls --enable-iconv --enable-libass --enable-libbluray --enable-libbs2b --enable-libcaca --enable-libdcadec --enable-libfreetype --enable-libgme --enable-libgsm --enable-libilbc --enable-libmodplug --enable-libmp3lame --enable-libopencore-amrnb --enable-libopencore-amrwb --enable-libopenjpeg --enable-libopus --enable-librtmp --enable-libschroedinger --enable-libsoxr --enable-libspeex --enable-libtheora --enable-libtwolame --enable-libvidstab --enable-libvo-aacenc --enable-libvo-amrwbenc --enable-libvorbis --enable-libvpx --enable-libwavpack --enable-libwebp --enable-libx264 --enable-libx265 --enable-libxavs --enable-libxvid --enable-lzma --enable-decklink --enable-zlib
  libavutil      54. 27.100 / 54. 27.100
  libavcodec     56. 45.101 / 56. 45.101
  libavformat    56. 40.100 / 56. 40.100
  libavdevice    56.  4.100 / 56.  4.100
  libavfilter     5. 19.100 /  5. 19.100
  libswscale      3.  1.101 /  3.  1.101
  libswresample   1.  2.100 /  1.  2.100
  libpostproc    53.  3.100 / 53.  3.100
[dshow @ 00000000032335c0] DirectShow video devices (some may be both video andaudio devices)
[dshow @ 00000000032335c0]  "USB Video Device"
[dshow @ 00000000032335c0]     Alternative name "@device_pnp_\\?\usb#vid_046d&pid_0825&mi_00#7&218d6046&0&0000#{65e8773d-8f56-11d0-a3b9-00a0c9223196}\global"
[dshow @ 00000000032335c0]  "UScreenCapture"
[dshow @ 00000000032335c0]     Alternative name "@device_sw_{860BB310-5D01-11D0-BD3B-00A0C911CE86}\UScreenCapture"
[dshow @ 00000000032335c0]  "screen-capture-recorder"
[dshow @ 00000000032335c0]     Alternative name "@device_sw_{860BB310-5D01-11D0-BD3B-00A0C911CE86}\{4EA69364-2C8A-4AE6-A561-56E4B5044439}"
[dshow @ 00000000032335c0] DirectShow audio devices
[dshow @ 00000000032335c0]  "Microphone (USB Audio Device)"
[dshow @ 00000000032335c0]     Alternative name "@device_cm_{33D9A762-90C8-11D0-BD43-00A0C911CE86}\Microphone (USB Audio Device)"
[dshow @ 00000000032335c0]  "virtual-audio-capturer"
[dshow @ 00000000032335c0]     Alternative name "@device_sw_{33D9A762-90C8-11D0-BD43-00A0C911CE86}\{8E146464-DB61-4309-AFA1-3578E927E935}"
[dshow @ 00000000032335c0]  "Microphone (Realtek High Defini"
[dshow @ 00000000032335c0]     Alternative name "@device_cm_{33D9A762-90C8-11D0-BD43-00A0C911CE86}\Microphone (Realtek High Defini"
dummy: Immediate exit requested

In the same command prompt, do the following:

cd C:\nginx

start "" nginx.exe

That should start nginx in the background and you should be able to browse to http://127.0.0.1:81/ and see “Welcome to nginx for Windows!” I used port 81 in the configuration in C:\nginx\conf\nginx.conf to avoid conflict with other web servers that might be installed. If for some reason nginx isn’t working for you, check error.log located in C:\nginx\logs. If this is done in any sort of production configuration, I highly recommend compiling the latest build with the RTMP module on a linux server.

Now, from a command prompt, enter the command “C:\ffmpeg\bin\ffmpeg -analyzeduration 2147483647 -probesize 2147483647 -rtbufsize 1500M -f dshow -i video=”UScreenCapture” -c:v libx264 -vf “scale=trunc(iw/2)*2:trunc(ih/2)*2″ -crf 40 -profile:v baseline -x264opts level=31 -pix_fmt yuv420p -preset ultrafast -f flv rtmp://127.0.0.1/view/%USERNAME%-%COMPUTERNAME%”. If you’d like you can use a streaming URL like rtmp://127.0.0.1/view/test. I like to try and use something that will be unique if multiple streams are being broadcasted, but something that is also meaningful.

C:\ffmpeg\bin\ffmpeg -analyzeduration 2147483647 -probesize 2147483647 -rtbufsize 1500M -f dshow -i video="UScreenCapture" -c:v libx264 -vf "scale=trunc(iw/2)*2:trunc(ih/2)*2" -crf 40 -profile:v baseline -x264opts level=31 -pix_fmt yuv420p -preset ultrafast -f flv rtmp://127.0.0.1/view/%USERNAME%-%COMPUTERNAME%
ffmpeg version N-73266-g4aa0de6 Copyright (c) 2000-2015 the FFmpeg developers
  built with gcc 4.9.2 (GCC)
  configuration: --enable-gpl --enable-version3 --disable-w32threads --enable-avisynth --enable-bzlib --enable-fontconfig --enable-frei0r --enable-gnutls --enable-iconv --enable-libass --enable-libbluray --enable-libbs2b --enable-libcaca --enable-libdcadec --enable-libfreetype --enable-libgme --enable-libgsm --enable-libilbc --enable-libmodplug --enable-libmp3lame --enable-libopencore-amrnb --enable-libopencore-amrwb --enable-libopenjpeg --enable-libopus --enable-librtmp --enable-libschroedinger --enable-libsoxr --enable-libspeex --enable-libtheora --enable-libtwolame --enable-libvidstab --enable-libvo-aacenc --enable-libvo-amrwbenc --enable-libvorbis --enable-libvpx --enable-libwavpack --enable-libwebp --enable-libx264 --enable-libx265 --enable-libxavs --enable-libxvid --enable-lzma --enable-decklink --enable-zlib
  libavutil      54. 27.100 / 54. 27.100
  libavcodec     56. 45.101 / 56. 45.101
  libavformat    56. 40.100 / 56. 40.100
  libavdevice    56.  4.100 / 56.  4.100
  libavfilter     5. 19.100 /  5. 19.100
  libswscale      3.  1.101 /  3.  1.101
  libswresample   1.  2.100 /  1.  2.100
  libpostproc    53.  3.100 / 53.  3.100
Input #0, dshow, from 'video=UScreenCapture':
  Duration: N/A, start: 860828.177000, bitrate: N/A
    Stream #0:0: Video: rawvideo, bgr24, 3200x1200, 10 tbr, 10000k tbn, 10 tbc
[libx264 @ 000000000322bee0] frame MB size (200x75) > level limit (3600)
[libx264 @ 000000000322bee0] MB rate (150000) > level limit (108000)
[libx264 @ 000000000322bee0] using cpu capabilities: MMX2 SSE2Fast SSSE3 SSE4.2AVX
[libx264 @ 000000000322bee0] profile Constrained Baseline, level 3.1
[libx264 @ 000000000322bee0] 264 - core 146 r2538 121396c - H.264/MPEG-4 AVC codec - Copyleft 2003-2015 - http://www.videolan.org/x264.html - options: cabac=0 ref=1 deblock=0:0:0 analyse=0:0 me=dia subme=0 psy=1 psy_rd=1.00:0.00 mixed_ref=0 me_range=16 chroma_me=1 trellis=0 8x8dct=0 cqm=0 deadzone=21,11 fast_pskip=1 chroma_qp_offset=0 threads=12 lookahead_threads=2 sliced_threads=0 nr=0 decimate=1 interlaced=0 bluray_compat=0 constrained_intra=0 bframes=0 weightp=0 keyint=250 keyint_min=10 scenecut=0 intra_refresh=0 rc=crf mbtree=0 crf=40.0 qcomp=0.60 qpmin=0 qpmax=69 qpstep=4 ip_ratio=1.40 aq=0
Output #0, flv, to 'rtmp://127.0.0.1/view/username-hostname':
  Metadata:
    encoder         : Lavf56.40.100
    Stream #0:0: Video: h264 (libx264) ([7][0][0][0] / 0x0007), yuv420p, 3200x1200, q=-1--1, 10 fps, 1k tbn, 10 tbc
    Metadata:
      encoder         : Lavc56.45.101 libx264
Stream mapping:
  Stream #0:0 -> #0:0 (rawvideo (native) -> h264 (libx264))
Press [q] to stop, [?] for help
frame=   14 fps= 14 q=27.0 size=     134kB time=00:00:00.10 bitrate=10985.6kbits

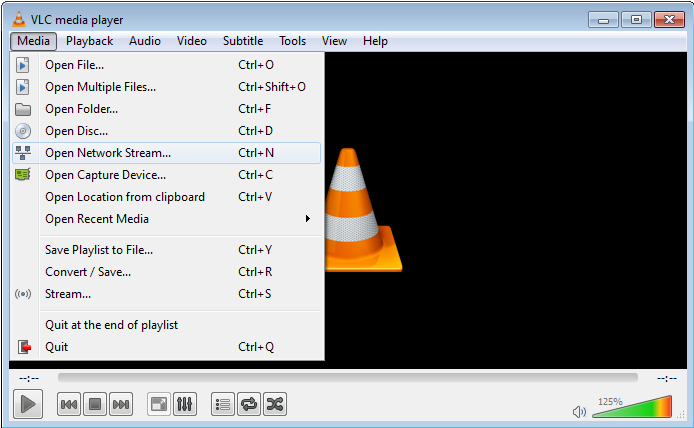
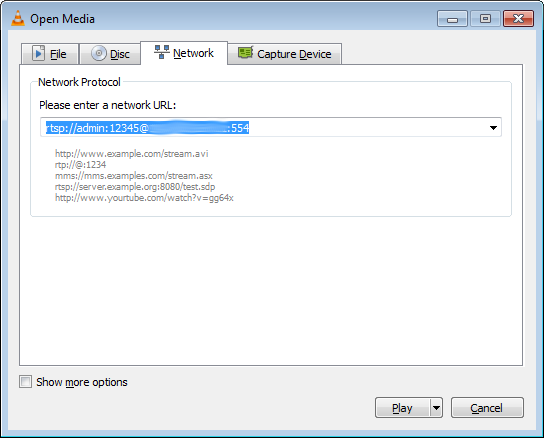
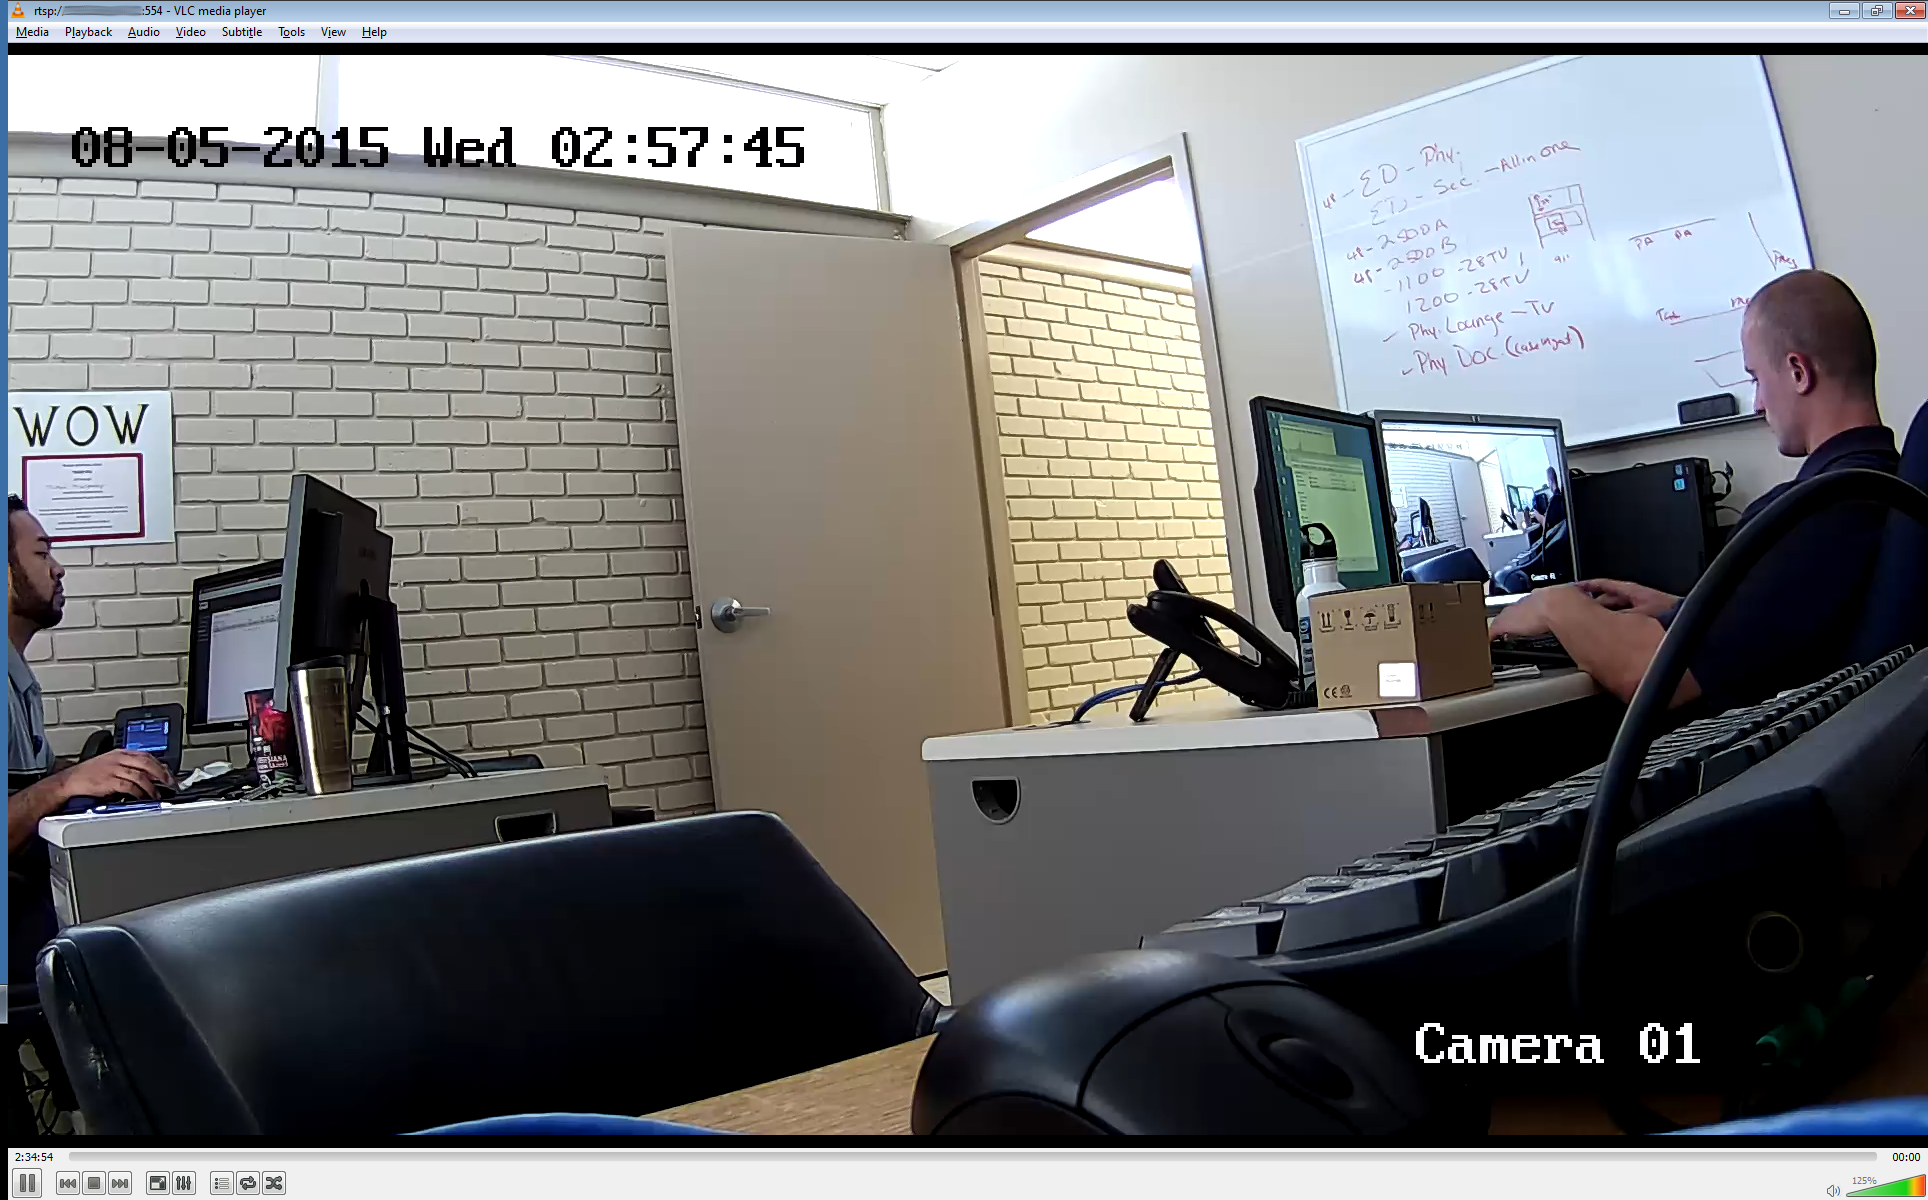
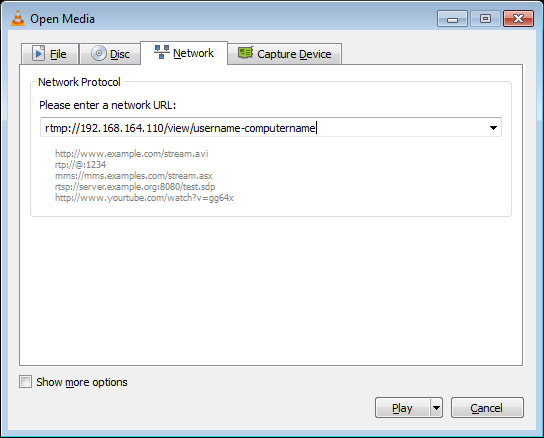
If the stream is working properly, you should see some statistics at http://127.0.0.1:81/stats, and you should see recordings being generated within C:\nginx\recordings. Use VLC to play the recordings. To view the stream live with VLC click Media->Open Network Stream and enter the network URL “rtmp://192.168.164.110/view/username-computername”. Keep in mind that the username and computername here are case sensetive and should match exactly what is shown on the statistics page http://127.0.0.1:81/stats.

vlc

Be patient as it can take some time for VLC to detect the video codec before it begins displaying. You can press “q” or Ctrl+c to stop the ffmpeg stream.

I did my best to tweak the command so that there is a good balance of quality and efficiency, but if you’d prefer higher quality video try changing the -crf parameter to a lower value like 23 or a slower -preset value like “fast”. A word of caution, the slower the preset you choose, the higher your CPU utilization will be. The “scale=trunc(iw/2)*2:trunc(ih/2)*2” part of the command is to avoid “not divisible by 2” errors when either your height or width stream resolution is an odd number. I ran into this in our VDI environment because you can resize the screen of the client to be any size you want and will frequently have this problem.

If video is all you need, at this point you can simply run the following vbs script using task scheduler with a logon and unlock event as the trigger:

Option Explicit

Dim WshShell

Set WshShell = CreateObject("Wscript.Shell")

WshShell.Run "C:\ffmpeg\bin\ffmpeg -analyzeduration 2147483647 -probesize 2147483647 -rtbufsize 1500M -f dshow -i video=""UScreenCapture"" -c:v libx264 -vf ""scale=trunc(iw/2)*2:trunc(ih/2)*2"" -crf 40 -profile:v baseline -x264opts level=31 -pix_fmt yuv420p -preset ultrafast -f flv rtmp://127.0.0.1/view/" & WshShell.ExpandEnvironmentStrings("%USERNAME%") & "-" & WshShell.ExpandEnvironmentStrings("%COMPUTERNAME%"), 0, False

task_scheduler

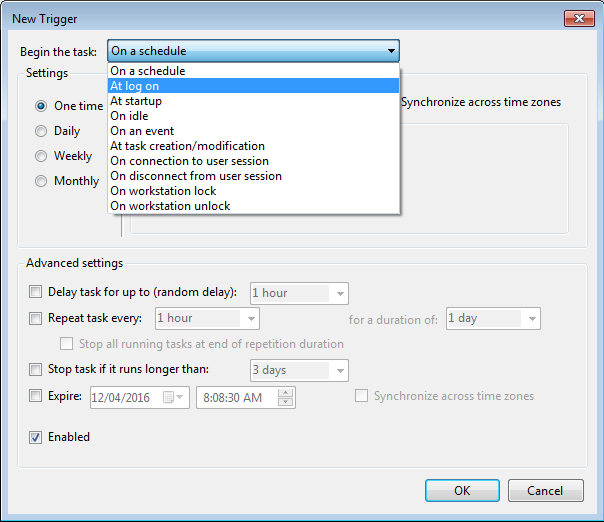
To kill ffmpeg at logoff/lock, use task scheduler again with the appropriate triggers and run the command taskkill /f /im ffmpeg.exe.

When I first set out to get screen recording working for my purposes, I was originally attempting to save directly to an MP4 over a CIFS share, but I still had to kill the ffmpeg process because obviously we want in running in the background and there is no way to interact with the process to stop it gracefully. Terminating the process in this way would corrupt the MP4. With NGINX receiving the RTMP stream and handling all of the recordings independently of ffmpeg, you are able to kill the process without corrupting the video files.

Be sure to do some testing to make sure ffmpeg is terminating and launching correctly during the events you are using to trigger it. It is a good idea to set up an idle timeout/screensaver that locks your workstation and kills ffmpeg’s stream to avoid wasting storage on useless video.

I’ll try to post some more flexible/dynamic scripts later to demonstrate how to capture audio from the local microphone and overlay a webcam. If you have any input or questions, please comment below.

Bash script to migrate all KVM or Xen virtual machines to another host with virsh/libvirt

I’m working on setting up two fully redundant servers to host all sorts of services from the house. Most of the HA is automated via keepalived scripts, but I needed another one to automatically migrate all VMs from one host to another using libvirt. This is analogous to putting an ESXi host in “maintenance mode”. I thought I share the bash script I threw together.


First make sure you can successfully migrate manually then replace the $HOST variable with your target host and give it a shot. The script will first migrate all live VMs and then do an offline migration of all powered off VMs. Enjoy!

#!/bin/bash

HOST="lyasnode1"

echo Migrating all VMs to $HOST

for VMS in `virsh list --name`; do echo Migrating VM $VMS live && virsh migrate --live --persistent --undefinesource $VMS qemu+ssh://lyasnode1/system; done

for VMS in `virsh list --all --name`; do echo Migrating VM $VMS offline && virsh migrate --offline --persistent --undefinesource $VMS qemu+ssh://lyasnode1/system; done

Convert all AVIs in your video library to MP4

I have a large video library and I’ve been on the look out for the best device to access all this media. It must support DLNA, not have cinavia, and obviously I’d like it to support as many audio and video codecs as possible. That eliminates most Sony products because they all seem to have Cinavia including PlayStation. I tried a chromecast and I won’t go into the details of how much I absolutely hated that useless piece of garbage. I still have a device running GoogleTV which is definitely my favorite, but unfortunately it has been discontinued by Google.


After much research I bought a Roku. I like it a lot, but it can be pretty picky about audio and video codecs. When videos have multiple audio streams whether it be DTS and stereo or multiple languages, the device will sometimes have no audio or play the wrong language. Fortunately, it is generally pretty simple to demux the streams and remap them in a way that the Roku will tolerate, but the device does not support AVI. This means if I want to keep the Roku around, I’ve either got to run Plex or some other transcoding capable DLNA server or convert all of my AVIs to H264 MP4s. I like to try to be as efficient as possible so which rules out transcoding a video every time you watch it, so I developed a little bash script to find all AVI files in my video library to MP4.

To run the script, you’ll need to have the perl-based “rename” utility installed as well as ffmpeg.

find /path/to/your/video/library/ -name "*.avi" -exec ffmpeg -i '{}' -c:v libx264 -crf 19 -preset slow -c:a libfaac -b:a 192k -ac 2 '{}'.mp4 \; -exec rename 's/.avi.mp4/.mp4/' "{}.mp4" \; -exec rm -f '{}' \;

Just change “/path/to/your/video/library/” to the real path to your video library and let the script do its thing. If you’d like to convert other video types, just change the search parameters “-name *.avi” to something that suits your needs. All videos will be re-encoded to H264 video, and 192k stereo AAC audio. It will then rename the file and delete the original file.

If anyone has any modifications or useful custom scripts you’d like to share, please leave them in the comments.

Update:

find /path/to/your/video/library/ -name "*.avi" -exec ffmpeg -i '{}' -c:v libx264 -crf 19 -preset slow -strict -2 -c:a aac -b:a 192k -ac 2 '{}'.mp4 \; -exec sh -c 'mv "$0.mp4" "${0%.avi}.mp4"' '{}' \; -exec rm -f '{}' \;

This one-liner doesn’t depend on a specific version of the rename utlilty. It also supports more versions of ffmpeg. The only flaw now is it only supports lowercase avi extension. Still working out the rename part of the script to handle that properly.

Enable Serial Console on CentOS/RHEL 7

Edit “/etc/sysconfig/grub”
Add to end of GRUB_CMD_LINELINUX, “console=ttyS0” Replace ttyS0 with your serial port.
Mine looks like this:

GRUB_TIMEOUT=5
GRUB_DEFAULT=saved
GRUB_DISABLE_SUBMENU=true
GRUB_TERMINAL_OUTPUT="console"
GRUB_CMDLINE_LINUX="rd.lvm.lv=centos/root rd.lvm.lv=centos/swap crashkernel=auto rhgb quiet console=ttyS0"
GRUB_DISABLE_RECOVERY="true"

Run the following commands as root: Again replace ttyS0 with your serial port

stty -F /dev/ttyS0 speed 9600
grub2-mkconfig -o /boot/grub2/grub.cfg
systemctl start getty@ttyS0


Force Reboot Linux Remotely


I have a cubieboard set up at a friend’s house as a VPN and a backup target. I went to SSH into it the other day and found that almost every command I entered returned “Input/output error”. So I did the obvious and attempted a reboot, however both commands “reboot” and “init 6” returned “Segmentation fault” and did nothing. So I set out to find the most generic way to force reboot any linux distro regardless of systemd, kernel version or any other variable, and I found it! The method reminded me a lot of ALT + SysRq + REISUB only not as gentle considering the only signal it sends is a reboot. Maybe it can be modified to include the REIS & U, but here is the command I used in case someone else out there is in a hurry to get back online without concern for a safe shutdown!

echo 1 > /proc/sys/kernel/sysrq
echo b > /proc/sysrq-trigger

Use VLC to view RTSP stream from LaView LV-PB932F4 IP Camera

My co-worker scored an awesome deal for a new NVR system on NewEgg.com. 6 weatherproof H.264 1080P PoE IP cameras (LaView LV-PB932F4) with an 8 channel NVR (LaView LV-KN988P86A4). Now that I’ve gotten a chance to see how cool these cameras are, I’m wishing I’d taken advantage of the $599.99 sale.


I asked him to bring one of the cameras to work so I could check it out. The first thing I wanted to know was whether it supported the RTSP or protocol that would allow me grab the stream without proprietary software. Otherwise, the camera would be useless to me. I couldn’t find the RTSP URL in LaView’s documentation or anywhere on the web so I figured I’d blog about it in case someone else might benefit from the information.

After you’ve provided your camera with an IP using LaView’s utility (which at the time of this writing was available here IP address search software (SADP) on LaView’s download page) open VLC and click the Media option in the upper left toolbar:vlc_media

Enter the RTSP URL, including the username and password in the string like so. rtsp://admin:12345@x.x.x.x:554. The default credentials are used in the example. Username: admin, password: 12345 and the default RTMP port is 554. All of these settings can be modified by visiting the internal webserver of the camera and logging into the administrative interface.vlc_rtsp

Here is a screenshot of VLC while we were streaming to our family and friends the view of our new office. That’s my co-worker Mike on the left and me on the right. This camera has a beautiful picture!vlc_stream

This is pretty straightforward, but I wanted to make sure I posted the RTSP URL for these cameras so that I won’t forget and in case someone else out there is looking for it. I’m able to capture still JPEGs over HTTP using a URL like this http://192.168.2.30/Streaming/Channels/101/picture.

We went on from here to use ffmpeg to input the RTSP stream and segment an HLS (HTTP live stream) stream served by nginx through our reverse proxy. This allowed us to share a link with others to check out the camera live from outside the office. If anyone is interested in the details of the setup, please leave a comment and I’ll try to put together a how to.

UPDATE: I finally got one of these things for myself and I thought I’d share the RTSP URL for the DVR too (). The basic format is like so:

rtsp://user:pass@192.168.2.30:8554/PSIA/streaming/channels/101

Most of it is self explanatory, but 101 is the HD stream for channel 1. 201 would be for channel 2, 301 for channel 3, etc. Also, you can type 102, 202, 302, etc for a low definition “thumbnail” stream for each of the channels. I was very excited to see this capability of the DVR because it opens up lots of possibilities with a little creativity and of course FFmpeg.

Spacewalk Certificate has expired!

UPDATE: The replacement certificate mentioned in this article expired July 13, 2018. Please see the link to the spacewalk project github wiki https://github.com/spacewalkproject/spacewalk/wiki/Refreshing-certificate posted in the comments by Dipak. Thank you for sharing!

I woke up this morning to a disturbing email from my CentOS 6.5 server running spacewalk 2.1:

Dear Spacewalk User,


This email is being sent to you to inform you that your Spacewalk Certificate has expired on your myserverFQDN server. After 7 day(s) the systems management services provided by your Spacewalk Server will be restricted for 24 days.

After that the services will become inaccessible.


Thank you for using Spacewalk.

–the Spacewalk Team

Browsing to the login page also prompts you with a similar message.

Your satellite certificate has expired. Please visit the following link for steps on how to request or generate a new certificate:https://access.redhat.com/knowledge/tools/satcert Your satellite enters restricted period in 6 day(s).

It was unpleasant to wake up to because I remember how much of a PITA it was to get my certificates to play nice with tomcat, jabber, and all of the other spacewalk components during the initial deployment. After some research I found that this certificate has nothing to do with the SSL certs I’d dealt with in the past. These alerts are in regards to a PGP certificate used for licensing and activation of spacewalk. Unfortunately there is not a lot of recent documentation on this. I did come across an article here https://fedorahosted.org/spacewalk/wiki/CertCreation that looked like it might be useful, and after downloading the attached template, downloading the perl script, and installing the perl prerequisites, I came to a hard stop on one of the last steps with this error:

RHN::Exception: invalid root
RHN::Cert /usr/share/perl5/vendor_perl/RHN/Cert.pm 52 RHN::Exception::throw
main gen-oss-sat-cert.pl 62 RHN::Cert::parse_cert

After some more research I found admins that were having this issue in 2010 here https://www.redhat.com/archives/spacewalk-list/2010-July/msg00042.html. They were able to overcome the issue by downloading a copy of the latest certificate. With this, I began to focus my research on a newer certificate hoping I could just replace the expired one with one redhat created for a newer version of spacewalk. Fortunately I was able to find an admin here https://www.redhat.com/archives/spacewalk-list/2014-December/msg00039.html that provided output on a newer certificate that expires in 2018. After some slight modifications to make it match the format found in the existing certificate, I came up with this:

<?xml version="1.0" encoding="UTF-8"?>
<rhn-cert version="0.1">
 <rhn-cert-field name="product">SPACEWALK-001</rhn-cert-field>
 <rhn-cert-field name="owner">Spacewalk Default Organization</rhn-cert-field>
 <rhn-cert-field name="issued">2007-07-13 00:00:00</rhn-cert-field>
 <rhn-cert-field name="expires">2018-07-13 00:00:00</rhn-cert-field>
 <rhn-cert-field name="slots">20000</rhn-cert-field>
 <rhn-cert-field name="monitoring-slots">20000</rhn-cert-field>
 <rhn-cert-field name="provisioning-slots">20000</rhn-cert-field>
 <rhn-cert-field name="virtualization_host">20000</rhn-cert-field>
 <rhn-cert-field name="virtualization_host_platform">20000</rhn-cert-field>
 <rhn-cert-field name="satellite-version">spacewalk</rhn-cert-field>
 <rhn-cert-field name="generation">2</rhn-cert-field>
 <rhn-cert-signature>
-----BEGIN PGP SIGNATURE-----
Version: GnuPG v1

iEYEABECAAYFAlNg/40ACgkQnnKdrwaUeTIXqwCgmRiTmzFuO7x3bitYPWcJFsZe
UPgAn0kTzWo7xUGDpedM0No9nEnWa84P
=FTXc
-----END PGP SIGNATURE-----
</rhn-cert-signature>
</rhn-cert>

To apply this new certificate, begin by making a backup of /usr/share/spacewalk/setup/spacewalk-public.cert.

cp /usr/share/spacewalk/setup/spacewalk-public.cert /usr/share/spacewalk/setup/spacewalk-public.cert.old

Then create the new certificate file using the output above or:

wget -P /usr/share/spacewalk/setup https://kernelmanic.com/wp-content/uploads/2015/07/spacewalk-public.cert

And finally, run the command:

rhn-satellite-activate --rhn-cert /usr/share/spacewalk/setup/spacewalk-public.cert --disconnected

The command should return the following output:

Pushing scout configs to all monitoring scouts

I then reloaded the web interface login screen for spacewalk and the error message was gone! So far everything seems to be functioning normally. Fingers crossed…