Convert a VHD image from a native Windows backup to raw format using qemu-img, and write it directly to a disk or partition with the Linux dd command
I’ve recently been evaluating native Windows Server Backup as an option for bare-metal backup and recovery for our remaining physical servers at work. The utility creates several XML files and a VHD image for each partition it backs up. It seems to work ok for the most part, but I ran into a problem when I came across a system that for some unknown reason had a 38MB boot partition with insufficient space to create a VSS snapshot, thus preventing the tool from properly backing up the partition. I’ve read all the articles about allocating storage on a separate partition to get VSS to behave, but I could never get it to function correctly.
This got me thinking… I have some personal trust issues with the reliability of Microsoft products to begin with and now I’m having these problems which are just reinforcing the fear of something going wrong during the restore process. This lead me to start researching restore options using the VHD files produced by the native Windows Server Backup.
Option 1 is to do a restore using a Windows installation CD and select the restore option. Option 2 is to mount the VHD and manually copy files. This option is really only good for individual file restores. Obviously this is not something you’d want to do for a bare metal restore. Option 3 is to restore the VHD image directly to disk. This is the option I was most interested in and it made sense to me that there would be a straightforward way of doing this as every other bare metal backup solution I’ve used had this sort of option. While searching for a tool to do a VHD to disk image I found “VHD2Disk”. Unfortunately this tool was designed to do just that… write a VHD to DISK. No option for writing to a partition. Feel free to correct me if I’m wrong, but I see no way of ever getting 2 partitions on a single disk with this tool which makes it useless for my purposes.
After finding that there were no tools to do a image to disk write I became curious to find out if there was a way to just use the dd command in linux. After all, I would have instinctively turned to dd if this were something I were doing with linux. dd does block by block copying and a block is a block regardless of which OS you’re using. I quickly learned this is not something that can be done directly with a VHD because they are not in raw format, but the qemu-img supports VHD format and has the ability to convert them to raw image format. Below you will find the detailed instructions of how to convert the VHD, and use dd to write your new image to disk or partition. I’ll also give some details about getting the system to boot if you’re like me in this case and you don’t have a good backup of the boot partition.
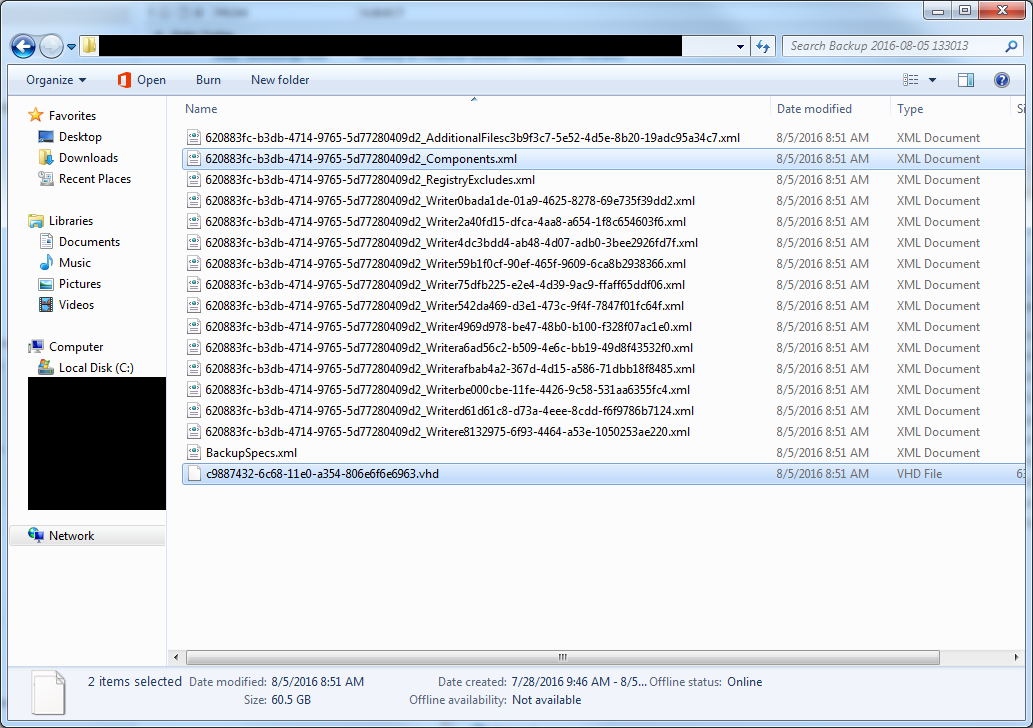
The backup directory created by Windows Server Backup will look like this. I’ve highlighted the “interesting files” that I’ll mention throughout the article. The one ending in “Components.xml” has useful information about the disk partition layout that can come in handy when recreating partitions on your new disk. The .vhd file is the actual image data.
First thing we need to do is convert the VHD image to raw format. To do so, you’ll need access to a linux environment and use the qemu-img command. I’d recommend using either a Clonezilla or GParted liveCD as they both have all sorts of utilities pre-installed for disk imaging and partitioning. Boot the CD on the system you will be using for the restore image. When it finishes booting type the following commands to install qemu-img: (You may need to type sudo before each command if you’re not root. Keep this in mind for the remaining command as well.)
apt-get update
apt-get install qemu-utils -y
My backups are on a windows file share so I’ll use the following command to mount them to the /mnt directory:
mount -t cifs -o username=YOURUSERNAME,domain=YOURDOMAIN //HOSTNAME/PATH /mnt
You’ll be prompted for your password to mount the share. Be sure to replace YOURUSERNAME, YOURPASSWORD, HOSTNAME, and PATH with the information appropriate for your environment.
Next change into the directory containing the VHD file you need to convert: (the path used in this command may vary greatly depending on your environment)
cd /mnt/WindowsImageBackup/SERVERNAME/Backup\ 2016-08-05\ 133013/
Use the following command to convert the VHD image into raw format:
qemu-img convert -f vpc -O raw c9887432-6c68-11e0-a354-806e6f6e6963.vhd myserver.raw
You’ll need to repeat this command for any additional partitions you need to convert. Be sure to change the .vhd and .raw filenames to those appropriate for your environment. To be clear, the .vhd filename should be the one that exists in this directory like the highlighted file in the screenshot above, and the .raw filename can be whatever you want to name it.
You’ll notice a new file will be created that will reflect the full size of the partition for the data it contains. This is expected considering the nature of the raw image format.
-rwxr-xr-x 1 root root  668 Aug  5 13:51 BackupSpecs.xml
-rwxr-xr-x 1 root root  61G Aug  5 13:51 c9887432-6c68-11e0-a354-806e6f6e6963.vhd
-rwxr-xr-x 1 root root 149G Aug  5 21:39 myserver.raw
The conversion process can take a long time depending on the size of the partition. You can use the following command to output the status of the process: (I’ve noticed there is often some delay before the command writes to stdout)
root@debian# kill -SIGUSR1 `pidof qemu-img`
root@debian#     (22.03/100%)
Next you’ll need to create the 100MB boot partition (unless you’re restoring only a single partition and all others are fully intact) and any additional partitions the system originally had. I’ll assume you know how to do this, but you can use the output below for help if necessary. In the event that you don’t know the original partition layout, you can use the raw image size as a hint or the “Components.xml” file generated by Windows Server Backup in the backup directory for the server. With the values BytesPerSector, PartitionOffset, and PartitionLength contained in that file, you can re-create the exact partition table.
BytesPerSector / PartitionOffset = starting sector
(BytesPerSector / PartitionOffset) + (BytesPerSector / PartitionLength) = ending sector
fdisk /dev/sda

Welcome to fdisk (util-linux 2.27).
Changes will remain in memory only, until you decide to write them.
Be careful before using the write command.


Command (m for help): n
Partition type
   p   primary (0 primary, 0 extended, 4 free)
   e   extended (container for logical partitions)
Select (default p): p
Partition number (1-4, default 1): 1
First sector (2048-335544319, default 2048):
Last sector, +sectors or +size{K,M,G,T,P} (2048-335544319, default 335544319): +100M

Created a new partition 1 of type 'Linux' and of size 100 MiB.

Command (m for help): t
Selected partition 1
Partition type (type L to list all types): 7
Changed type of partition 'Linux' to 'HPFS/NTFS/exFAT'.

Command (m for help): a
Selected partition 1
The bootable flag on partition 1 is enabled now.

Command (m for help): n
Partition type
   p   primary (1 primary, 0 extended, 3 free)
   e   extended (container for logical partitions)
Select (default p): p
Partition number (2-4, default 2):
First sector (206848-335544319, default 206848):
Last sector, +sectors or +size{K,M,G,T,P} (206848-335544319, default 335544319):

Created a new partition 2 of type 'Linux' and of size 159.9 GiB.

Command (m for help): t
Partition number (1,2, default 2): 2
Partition type (type L to list all types): 7

Changed type of partition 'Linux' to 'HPFS/NTFS/exFAT'.

Command (m for help): p
Disk /dev/sda: 160 GiB, 171798691840 bytes, 335544320 sectors
Units: sectors of 1 * 512 = 512 bytes
Sector size (logical/physical): 512 bytes / 512 bytes
I/O size (minimum/optimal): 512 bytes / 512 bytes
Disklabel type: dos
Disk identifier: 0x5dcc5434

Device     Boot  Start       End   Sectors   Size Id Type
/dev/sda1  *      2048    206847    204800   100M  7 HPFS/NTFS/exFAT
/dev/sda2       206848 335544319 335337472 159.9G  7 HPFS/NTFS/exFAT

Command (m for help): w
The partition table has been altered.
Calling ioctl() to re-read partition table.
Syncing disks.
If you created the 100MB boot partition, format it as NTFS and the default “System Reserved” label:
mkfs.ntfs -f /dev/sda1 -L "System Reserved"
The VHDs always store the image as a partition within the image which means we have to get the offset to determine where the data actually begins in the raw image before we write it to disk. Use the following command:
fdisk -l myserver.raw

Disk myserver.raw: 148.1 GiB, 158967767040 bytes, 310483920 sectors
Units: sectors of 1 * 512 = 512 bytes
Sector size (logical/physical): 512 bytes / 512 bytes
I/O size (minimum/optimal): 512 bytes / 512 bytes
Disklabel type: dos
Disk identifier: 0x00000000

Device        Boot Start       End   Sectors   Size Id Type
myserver.raw1        128 310483071 310482944 148.1G  7 HPFS/NTFS/exFAT
The values “512” and “128” are what we need from this output. This tells us that the block size is 512 bytes and the partition starts at sector 128. Now we have all the information we need to give dd to write the image to our physical disk using this command:
dd if=myserver.raw bs=512 skip=128 of=/dev/sda2
You’ll need to repeat this command for any additional partitions you need to restore. You can use the following command to get the status of the dd process:
kill -SIGUSR1 `pidof dd`

369665+0 records in
369665+0 records out
189268480 bytes (189 MB) copied, 12.4497 s, 15.2 MB/s
When the dd command finishes writing the image to /dev/sda2, you should be able to mount the NTFS partition and view the files like so:
mkdir /sda2
mount -t ntfs-3g /dev/sda2 /sda2
ls -l /sda2
total 6267677
lrwxrwxrwx 2 root root         60 Jul 14  2009 Documents and Settings -> /sda2/Users
-rwxrwxrwx 1 root root 6327107584 Jul 31 11:03 pagefile.sys
drwxrwxrwx 1 root root       4096 Feb 17  2015 Patch Management
drwxrwxrwx 1 root root          0 Jul 14  2009 PerfLogs
drwxrwxrwx 1 root root       4096 Jun 17 07:44 ProgramData
drwxrwxrwx 1 root root       4096 Jul 21  2014 Program Files
drwxrwxrwx 1 root root       4096 Mar 22  2013 Program Files (x86)
drwxrwxrwx 1 root root          0 Apr 21  2011 Recovery
drwxrwxrwx 1 root root       8192 Apr 22 19:10 $Recycle.Bin
drwxrwxrwx 1 root root       4096 Aug  6 13:30 System Volume Information
drwxrwxrwx 1 root root       4096 May 30 14:16 Users
drwxrwxrwx 1 root root      24576 May 30 14:07 Windows
After you’ve restored all of your partitions, its time to reboot. Don’t forget to make sure the boot flag is on for your boot partition. If you didn’t have a copy of the boot partition, you’ll need to use the windows installation CD to repair the MBR. This usually involves a combination of the startup repair option available from the installation CD as well as some of the boot repair utilities that you can use from a command prompt on the windows installation CD. Like these:
bootrec /fixboot
bootrec /fixmbr
bootrec /rebuildbcd
cdromdriveletter:\boot\bootsect\bootrec /nt60 SYS /mbr
UPDATE:
I recently found a cool new way of mounting the VHD image directly and imaging from the virtual block device instead of waiting for the qemu-img conversion and using up all of your precious storage for the VHD image you already have as well as a raw copy of the data. Below are the commands to enable the NBD kernel module with the right arguments, mount the VHD image as a virtual block device, and perform a dd copy to your physical disk. This is assuming you’ve already booted the liveCD, installed the qemu-utils, mounted the media containing your backups, and changed directly to the path containing the VHDs.
rmmod nbd
modprobe nbd max_part=16
qemu-nbd -c /dev/nbd0 c9887432-6c68-11e0-a354-806e6f6e6963.vhd
dd if=/dev/nbd0p1 of=/dev/sda2
You can see I’m using /dev/nbd0p1 as the source for the dd command. This is because as I mentioned earlier in the article, each VHD image contains a partition. nbd0p1 is referencing the first partition (the only partition) in the nbd0 virtual block device. Previously we had to specify the block size and offset with the dd command to specify where the partition started. Use the following command to remove the virtual block device for the VHD image.
qemu-nbd -d /dev/nbd0
If you have any questions or if you found this post useful, please leave a comment!
